The Communications ToolBox (CTB) is surprisingly flexible API (Application Programmer Interface) created by Apple to allow developers to easily add modem communications to their programs.
What this means to us gamers is that it allows us to play games in environments beyond what was built into the game. For example, Command & Conquer players often ask me how to play net games over a localtalk network (it can be difficult to configure IPX for Localtalk). Because C&C uses the Communications Toolbox, players now have a variety of ways to configure net games.
The Communications Toolbox works the same and is a consistance interface no matter what program you are using. Typically, in games, you click either 'call out' or 'wait for call', that will usually drop you into the CTB. From there, simply select the tool from pop up method menu and configure away!
Contents of this Page:
| CTB Overview |
With any of these tools, you'll have to pre-arrange with your opponent who is initiate (call) and who is going to wait for the connection. Remember, no matter which of these tools you use, you have to think of it in terms of one person calling and the other answering.
Getting to the 'call' or 'answer' options will vary from program to program, but once it drops you into the Communications Toolbox, the interface is the same. To select the tool you want, simply select it from the Connection Settings Method pop-up menu.
Finally, as with all things, your mileage may vary depending on the game and tool you're using. By the way, I tested each of these tools by simply bringing up a terminal session in ClarisWorks (which uses the CTB for communications) and typing back and forth.
So, onto the good stuff...
| Configuring the Apple Modem Tool |
Don't have the Apple Modem Tool installed? Scroll down below to see how to custom install this tool.
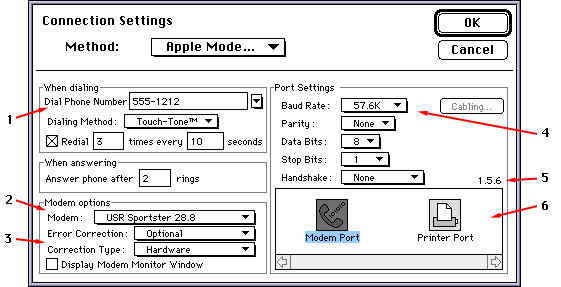
- Dialing Phone Number - Enter the phone number you're dialing here. If it is a number you dial frequently, you can select the 'Modify this menu...' from the pop up list (next to the phone number field) and enter the number there.
- Modem Options - Select you modem from this pop up menu.
- Error Correction & Correction Type -
- Baud Rate - Set the Baud Rate to 57.6 or better.
- Version - This is the Apple Modem Tool version. Make sure you are using 1.5.3 or later (1.5.6 offers better compatiblity with faster PowerMacs, and is included with System Software 7.6 and later). I've seen modem compatibility problems fixed simply by upgrading this.
- Port Settings - This is obvious, make sure you select the port the modem is connected to.
Adding Modem Definitions to the Apple Modem Tool
The Apple Modem Tool has the flexibility to allow you to add your own modem definitions.
From the Modem pop-up menu (in the 'Modem Options' section), select "Modify this menu..." and you will get the following dialog:
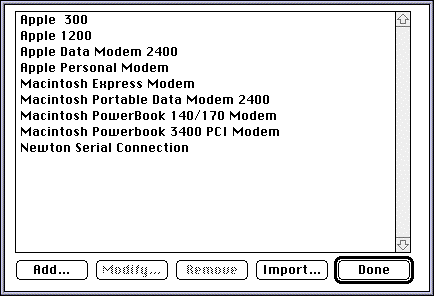
Click 'Add' and the following dialog opens:
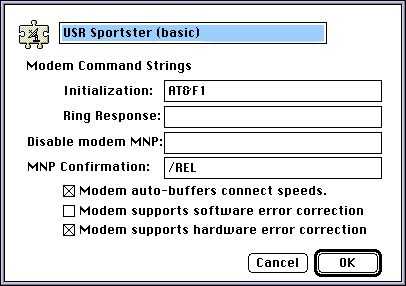
In the first field, give this modem definition a name. Remember you can set up several definitions for the same modem and simply select between the various ones from the pop-up menu. In this example, I've named it "USR Sportster (basic)", after the type of modem I have and the definition I'll be assigning.
For this modem string I'm using AT&F1 (recall AT is the modem ATtention, and &F1 tells the modem to return to the factory defaults).
Leave the next two fields ('Ring Response' and 'Disable modem MNP') blank, you won't need them. The 'MNP Confirmation' has a default entry of "/REL", leave it alone even it will unlikely effect most users. Check the 'Modem auto-buffers connect speeds' and 'Modem supports hardware error correction' boxes.
For more info on modem settings, please see the 'modem configuration' section of the Game Performance Tuning page.
| Configuring the Appletalk ADSP Tool |
The 'Appletalk ADSP Tool' is a tool that enables CTB applications to talk over an Appletalk network. Traditionally, this tool hasn't had much use (afterall, just about any network application is going to have built-in Appletalk), but lately there have been a couple games that do not natively support Appletalk (i.e. Command & Conquer and Worms).
Download Appletalk ADSP Tool (49k)
If you haven't done so already, download the tool and drag it onto the system folder (the computer should ask you if you want it placed in the Extensions folder, click 'Ok'). You do not need to restart.
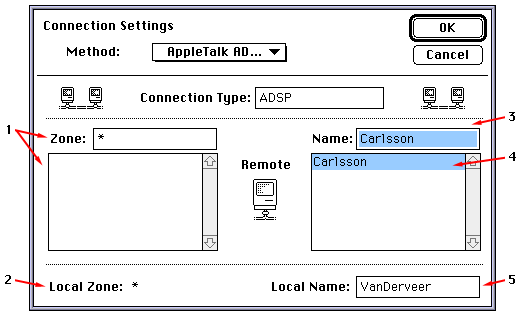
- Zone and Zone List - This shows your currently selected zone. If you are in a large building or campus, you may have have several zones to choose from, otherwise you will only see a *.
- Local Zone - This shows you the network zone your computer is in. A * indicates that there is only one default network.
- Remote Name - This is the currently selected remote user. Clicking 'Ok' would connect with this user.
- Remote List - If several people are waiting for connections, they'd show up in this field. Click on a name you want to connect with and click 'Ok'.
- Local Name - This is the name of your computer. The initial name is the same as listed in your 'Sharing Setup' control panel. You can also rename your remote name in this field.
Select the zone you will find you opponent in. If you are on a small network, you'll only have one zone, which represented by a *, and you'll have nothing in the zone list. From the Remote list, select your opponent, which will be then listed in the 'Name' field. Click the 'Ok' button and you'll be ready to rock!
| Configuring the Outland TCP Tool |
The Outland TCP Tool is easy to configure.
If you haven't done so already, download the tool and drag it onto the system folder (the computer should ask you if you want it placed in the Extensions folder, click 'Ok'). You do not need to restart.
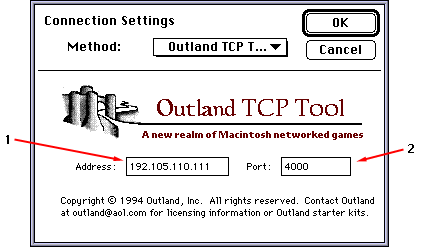
- Address - Enter the IP address of your opponent
- Port - Port 4000 is the default port for this tool, you shouldn't change it.
This tool is extremely easy to configure; simply enter the IP address of your opponent and click 'Ok'.
Make sure you do not change the Port number (unless you know what you're doing). The port number must be the same on both computers.
Interestingly, I was unable to get Apple's own MacTCP Tool 1.2 to work at all...
| Configuring the Serial Tool |
Use the Serial Tool when connecting your computers via a serial link. It's fairly easy to connect two computers via serial cable; and you can even connect a Mac and a PC serially! The Networking 101 details how to connect the computers.
Don't have the Serial Tool installed? Scroll down below to see how to custom install this tool.

The Serial tool is also fairly easy to configure:
- Port Settings - Generally speaking, set the port speed to the highest setting (57600). All other settings should remain at their default.
- Current Port - This is obvious, make sure to select the port the serial cable is connected to.
The only thing you have to watch out for here is to make sure you have the same port speed on both computers. Unlike modems that auto-negotiate a connect speed, whatever you set the serial speed to is what the computer will expect to talk at.
If you are experiencing problems, try lowering the serial speed. Because direct serial connections don't have the latency problems of modems, even 9600 serial connection can feel fast compared to a fast 28.8 modem!
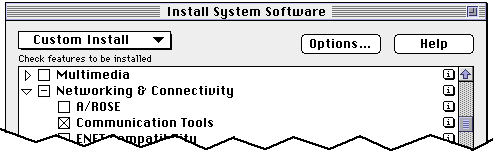
| Installing Apple Modem Tool and Serial Tool |
The Apple Modem Tool and Serial Tool is included with your system software. Due to an oversite in the Apple install script, it may have not been installed on your system.
To install, put your System Software CD in the drive and run the installer. Select 'Custom Install'. From the custom install screen, click the down arrow for 'Connectivity' and select 'Communication Tools', and click install.
© Copyright 1997 Rick VanDerveer